


Composition That Works: 10 Simple Techniques to Instantly Improve Your Photos

Welcome, Southwest Missouri Camera Club photographers! Whether you’re just picking up a camera or have years of experience, one thing remains true:
👉 Great composition is what separates a snapshot from a stunning photograph.
The best part? You don’t need new gear to improve your photos—just a better understanding of how to frame what’s already in front of you.
In this article, we’ll walk through 10 simple but powerful composition techniques, each with clear visual examples so you can immediately apply them in your own photography.
1. Rule of Thirds
The Rule of Thirds is one of the most well-known and effective composition techniques.
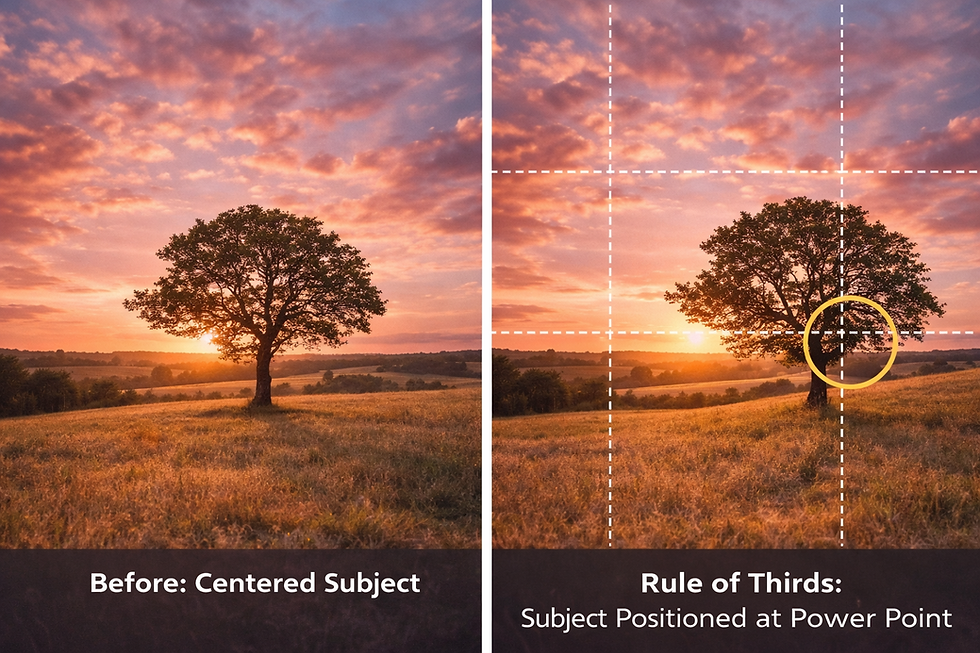
Imagine your image divided into a grid of 9 equal sections (3 across, 3 down). Instead of placing your subject directly in the center, try positioning it along one of the lines or where the lines intersect—these are called power points.
👉 This creates a more balanced, natural, and visually engaging image.
When to use it:
Landscapes (place horizon on top or bottom third)
Portraits (place eyes along the top third)
Any subject where you want a more dynamic feel
2. Leading Lines
Leading lines are one of the most powerful ways to guide your viewer’s eye through an image.
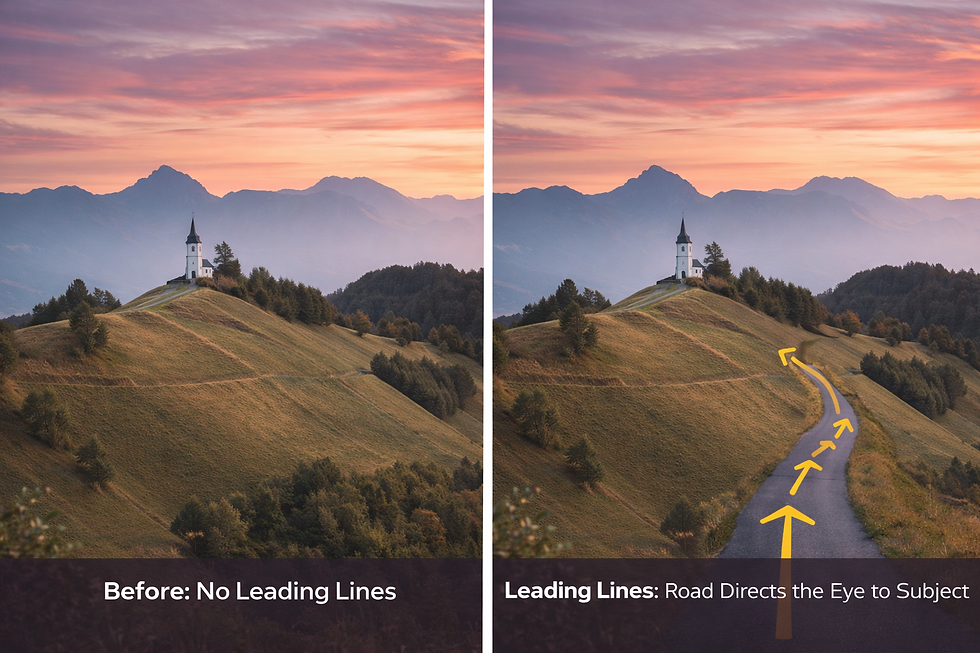
These are natural or man-made lines within a scene that lead toward your subject or draw attention to a specific part of the photo.
👉 Instead of your viewer randomly scanning the image, leading lines intentionally direct their focus.
Common Examples of Leading Lines:
Roads and sidewalks
Fences
Rivers or shorelines
Bridges
Hallways or staircases
Rows of trees
Why It Works
Our eyes naturally follow lines. When you use leading lines in your composition, you’re essentially telling the viewer where to look first—and where to go next.
This creates:
Stronger visual flow
More depth
A more engaging image
How to Use It
Position yourself so the lines start near the foreground
Let the lines lead toward your subject
Try shooting from a lower angle to exaggerate the effect
Use wide-angle lenses to make lines feel more dramatic
Pro Tip
Leading lines don’t always have to point directly at your subject—they can also guide the viewer through the image for a storytelling effect.
3. Framing
Framing is when you use elements within your scene to surround or “frame” your subject, helping draw attention directly to it.
Think of it like putting your subject inside a natural picture frame.
👉 This technique instantly adds depth, focus, and storytelling to your image.
Common Framing Elements:
Doorways or windows
Tree branches or leaves
Archways
Bridges
Foreground objects (like flowers or fences)
Why It Works
Framing helps:
Direct the viewer’s eye exactly where you want it
Eliminate distractions around the edges
Add a sense of depth (foreground → subject → background)
Instead of everything competing for attention, your subject becomes the clear focal point.
How to Use It
Look for natural frames in your environment
Move your position slightly to “line up” the frame around your subject
Shoot through something, not just at your subject
Use a wider aperture (lower f-stop) to softly blur the frame if needed
Pro Tip
Foreground framing doesn’t have to be perfect—sometimes a slightly imperfect or blurred frame actually feels more natural and artistic.

4. Symmetry & Balance
Symmetry and balance are all about creating a sense of visual harmony in your photo.
Symmetry occurs when one side of your image mirrors the other, while balance is about distributing visual weight so one side doesn’t feel “heavier” than the other.
👉 When used well, this technique creates images that feel clean, intentional, and satisfying to look at.
Types of Symmetry:
Reflection symmetry (water reflections, mirrors, glass)
Architectural symmetry (buildings, hallways, bridges)
Natural symmetry (butterflies, flowers, patterns)
Why It Works
Our brains are naturally drawn to symmetry—it feels orderly and pleasing.
Balanced images:
Feel more professional
Hold the viewer’s attention longer
Create a sense of calm and structure
How to Use It
Place your subject dead center when using symmetry (this is one time breaking Rule of Thirds works!)
Look for reflections in water, windows, or shiny surfaces
Use gridlines to align your shot perfectly
Keep your horizon level—symmetry breaks quickly if it’s tilted
Pro Tip
If your scene isn’t perfectly symmetrical, you can still create balance by placing a larger subject on one side and a smaller element on the other.

5. Depth (Foreground, Midground, Background)
One of the easiest ways to make your photos look more professional and immersive is by creating depth.
Instead of a flat image, you want your photo to feel like it has layers—almost like the viewer could step right into it.
👉 This is done by including elements in the foreground, midground, and background.
What This Means:
Foreground → What’s closest to your camera
Midground → Your main subject
Background → What’s behind your subject
Why It Works
Our eyes naturally perceive the world in layers. When your photo includes these layers, it:
Feels more three-dimensional
Adds visual interest
Creates a stronger sense of place and storytelling
How to Use It
Add something in the foreground (flowers, rocks, fences, people, etc.)
Place your subject in the midground
Use the background to support the scene (mountains, sky, buildings)
Try shooting through something to add depth
Use a wide-angle lens to exaggerate the layering effect
Pro Tip
Even a slightly blurred foreground can dramatically improve your image—it adds depth without distracting from your subject.

6. Fill the Frame
“Filling the frame” means getting close enough to your subject so that it dominates the image, leaving little to no empty or distracting space around it.
👉 Instead of showing everything, you focus on what matters most.
Why It Works
When you fill the frame:
Your subject becomes clear and powerful
Distractions are eliminated
Details and textures become more noticeable
The image feels more intentional and impactful
When to Use It
Portraits (face fills most of the frame)
Macro photography (flowers, insects, textures)
Details (wedding rings, hands, eyes, fabric, food, etc.)
Wildlife (tight crops on animals)
How to Use It
Physically move closer to your subject
Zoom in with your lens
Crop tighter during editing if needed
Pay attention to edges—avoid awkward cut-offs (like chopping off fingers or limbs unintentionally)
Pro Tip
Don’t be afraid to get really close. Sometimes the most powerful images come from showing only part of a subject, rather than the whole thing.

7. Negative Space
Negative space is the area around your subject—the empty or uncluttered parts of your image.
Instead of filling every inch of your frame, you intentionally leave space to help your subject stand out.
👉 Sometimes what you leave out is just as important as what you include.
What Counts as Negative Space?
Sky
Water
Walls
Open fields
Blurred or minimal backgrounds
Why It Works
Negative space:
Draws attention directly to your subject
Creates a clean, modern look
Adds emotion (calm, loneliness, simplicity)
Helps your image “breathe”
How to Use It
Place your subject off-center (this pairs really well with Rule of Thirds)
Keep the background simple and uncluttered
Use large areas of one tone or color
Don’t be afraid of “empty” areas—they are intentional
Pro Tip
Negative space is perfect for storytelling. A small subject surrounded by space can feel:
Peaceful
Isolated
Dramatic
Thoughtful

8. Patterns & Repetition
Patterns and repetition occur when elements in your photo repeat in a predictable way—and they can be incredibly eye-catching.
👉 Our brains love patterns because they create order, rhythm, and visual interest.
Common Examples of Patterns:
Rows of chairs or windows
Bricks or tiles
Waves or ripples
Trees in a forest
Repeating shapes, colors, or textures
Why It Works
Patterns:
Create a strong sense of structure and harmony
Naturally draw the viewer’s attention
Make images feel more intentional and artistic
They can be calming when consistent—or dramatic when broken.
How to Use It
Look for repetition in everyday scenes (you’ll start seeing it everywhere!)
Fill the frame with the pattern for maximum impact
Shoot straight-on for a clean, graphic look
Use symmetry to enhance the effect
Pro Tip
👉 The most powerful compositions often happen when you break the pattern.
For example:
One red umbrella in a sea of black umbrellas
One person standing out in a crowd
A missing tile in a perfect grid
That break becomes your subject.

9. Perspective & Angle
Sometimes the biggest improvement you can make isn’t changing your settings—it’s simply changing where you stand.
Perspective and angle are all about how you view your subject. By moving your camera position, you can completely transform a scene.
👉 A small shift in angle can turn an ordinary photo into something unique and eye-catching.
Types of Perspective to Try:
Eye Level → Natural, what we normally see
Low Angle → Makes subjects look larger, stronger, more dramatic
High Angle → Makes subjects look smaller, softer, more vulnerable
Bird’s Eye View → Straight down (great for patterns and storytelling)
Worm’s Eye View → Very low, looking up (adds drama and scale)
Why It Works
Changing perspective:
Creates more interesting compositions
Helps your photo stand out
Adds emotion and storytelling
Shows your subject in a way people don’t normally see
How to Use It
Don’t just shoot from standing height—move your feet!
Crouch down, climb higher, or shoot from the side
Walk around your subject and test different angles
Look for reflections or unique vantage points
Pro Tip
If a photo feels boring, ask yourself:👉 “What would this look like from a completely different angle?”
That one question can change everything.

10. Simplify Your Scene
One of the most powerful things you can do as a photographer is simplify.
Instead of trying to capture everything, focus on one clear subject and remove anything that distracts from it.
👉 Less really is more.
Why It Works
A simplified image:
Is easier for the viewer to understand instantly
Feels more intentional and professional
Keeps attention exactly where you want it
Reduces visual clutter and confusion
How to Simplify Your Photos
Change your angle to eliminate distracting backgrounds
Move closer or zoom in
Use a wide aperture (low f-stop) to blur the background
Pay attention to edges—remove anything pulling attention away
Choose clean, simple backgrounds when possible
What to Watch For
Common distractions:
Bright objects in the background
Poles or trees “growing” out of heads
Busy or cluttered environments
Competing subjects
Pro Tip
Before you take the shot, ask yourself:👉 “What is the ONE thing this photo is about?”
If the answer isn’t obvious, simplify.

Putting It All Together
Now that you’ve learned these 10 composition techniques, here’s the key takeaway:
👉 You don’t need to use all of them at once.
In fact, the best images often use just one or two techniques really well.
Next time you go out to shoot, try this:
Pick one technique (like leading lines or negative space)
Focus on it intentionally
Experiment with different variations
Over time, these techniques will become second nature—and you’ll start seeing compositions everywhere.
Challenge for Our Members 📷
Want to put this into practice?
We challenge you to go out and capture one photo for each of these 10 techniques.
Share your images in the club group or at the next meeting
Tell us which technique you used
Bonus: Share which one felt the most natural—and which one challenged you
This is a great way to grow and learn from each other!
Final Thoughts
Photography isn’t just about capturing what you see—it’s about how you choose to show it.
By being intentional with your composition, you can:
Tell stronger stories
Create more impactful images
And develop your own unique style
No matter your skill level, mastering composition is one of the fastest ways to elevate your photography.
Keep Shooting & Keep Creating
— Southwest Missouri Camera Club


Comments